From Open Registration to Invitation-Only: A Security Imperative
Open self-registration is a security risk. While convenient for user acquisition, unrestricted registration opens the door to spam accounts, bot attacks, and abuse of free tiers-problems that plague many SaaS platforms.
Enterprise customers need better control. Invitation-only registration ensures that only authorized users can access your systems, while time-limited tokens prevent misuse and maintain security boundaries.
The Keycloak Invite Registration extension solves this. This custom SPI enforces invitation-only registration with secure, time-limited tokens. You maintain Keycloak’s powerful identity management while adding the security controls enterprise applications require.
Step-by-Step Invitation Process Flow
- Token Request: Administrator or API client requests registration token for specific user
- Token Generation: System creates cryptographically secure token with embedded metadata
- Storage: Token persists in database with expiration timestamp
- Distribution: Token sends to target user via secure channel (email, API response)
- Registration Attempt: User navigates to registration endpoint with token
- Validation: Authenticator SPI validates token authenticity and expiration
- User Creation: Valid tokens proceed with standard registration workflow
- Token Invalidation: Successfully used tokens become invalid for future use
Installing the Keycloak Invite Registration Extension
A quick guide to set up invitation-only registration for your Keycloak instance.
Prerequisites
- Keycloak 26.0.0 or higher
- Java 21 or higher
- Admin access to your Keycloak server
Installation Steps
1. Download the Extension
Visit the GitHub releases page and download the latest keycloak-invite-registration-*.jar file.
Alternatively, clone and build from source:
git clone https://github.com/VlastoLabs/keycloak-invite-registration.git
cd keycloak-invite-registration
mvn clean install
2. Deploy to Keycloak
Copy the JAR file to your Keycloak providers directory:
cp keycloak-invite-registration-*.jar /opt/keycloak/providers/3. Restart Keycloak
bash
/path/to/keycloak/bin/kc.sh start4. Configure the Registration Flow
- Log into Keycloak Admin Console Navigate to Authentication → Flows
- Find the registration flow and click the ⋮ menu, then select Duplicate
- Name it (e.g., “Registration with Invite”)
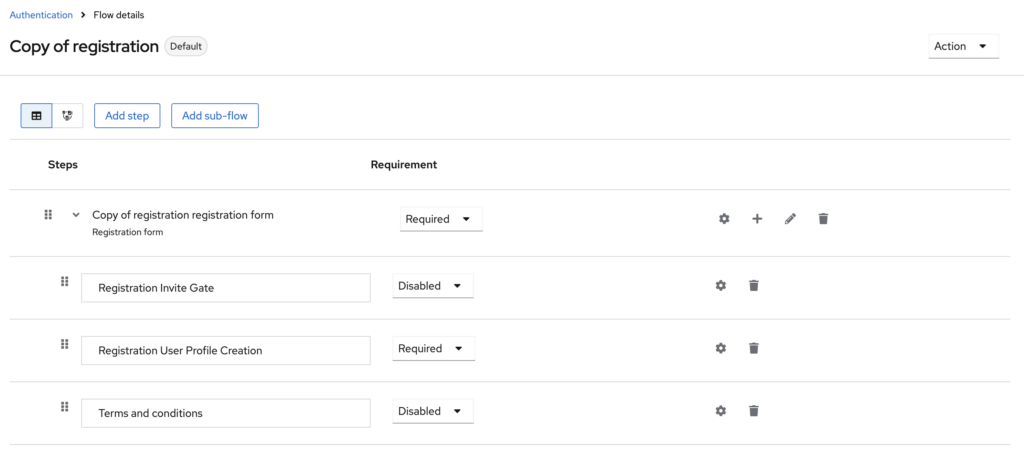
- Click Add step and select “Registration Invite Gate“
- Drag and drop the “Invite Code Validation” step to place it above the “Registration User Profile Creation” step
- Set “Registration Invite Gate” execution to REQUIRED
Bind the New Flow
- Navigate to Authentication → Find your new flow (e.g., “Registration with Invite”) -> Click the ⋮ menu -> Bind flow -> Registration Flow
- Click Save
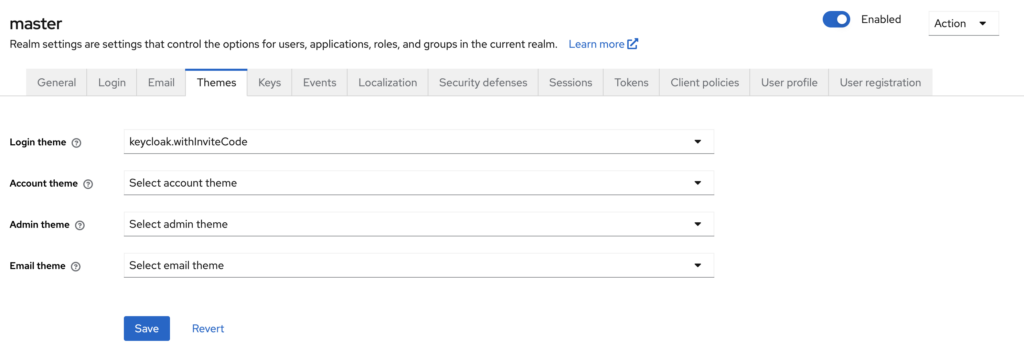
Configure the Login Theme
- Navigate to Realm Settings → Themes
- Under Login theme, select “keycloak.withInviteCode”
- Click Save
5. Usage
Generate invitation tokens via the REST API:
curl -X POST \
  http://localhost:8080/admin/realms/{realm}/invites/generate \
  -H 'Authorization: Bearer <admin_token>' \
  -H 'Content-Type: application/json'
Response:
{
  "token": "aab396f3-0e16-492e-b5ff-e15d90d7aa56",
  "realm": "mycompany",
  "message": "Invitation token generated successfully",
  "expirationTime": 1703123456789,
  "used": false
}
Build the Registration URL
Construct the registration URL with the `inviteCode` parameter:https://auth.example.com/realms/{realm}/protocol/openid-connect/registrations?client_id={client_id}&scope=openid%20profile&redirect_uri={redirect_uri}&response_type=code&inviteCode={token}
Complete Example:https://auth.example.com/realms/mycompany/protocol/openid-connect/registrations?client_id=my-app&scope=openid%20profile&redirect_uri=https://app.example.com/callback&response_type=code&inviteCode=aab396f3-0e16-492e-b5ff-e15d90d7aa56
URL Parameters:
{realm}– Your Keycloak realm name (e.g.,mycompany){client_id}– Your OIDC client ID (e.g.,my-app){redirect_uri}– URL-encoded redirect URI after registration (e.g.,https://app.example.com/callback){token}– The invitation token from step 1
Send the Invitation
Share the complete registration URL with your invitee via email or other secure channel. When they open the link, they’ll be directed to the registration form with the invitation token automatically validated.
Important Notes:
- Tokens expire after 24 hours
- Each token can only be used once
- Users without a valid token cannot register
GitHub Repository: VlastoLabs/keycloak-invite-registration
If you are interested in partnering with us, need a tailored solution, or would like to help shape the future direction of our Keycloak extension, we would be glad to connect. Please reach out at [email protected]
Leave a Reply